Tuesday, 17 July 2007

Split toning

Sorry it has been so long between posts however my real life has been hectic of late with little time for photography or blogging, however I thought I better squeeze a bit of blogging in at least.

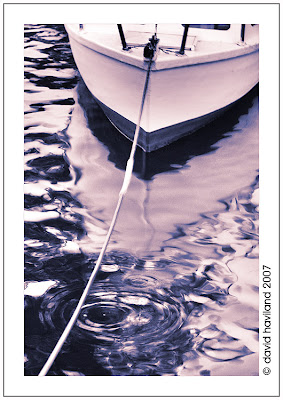
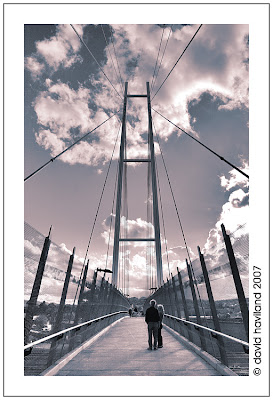
Today I thought I would give a tutorial in a processing method I use fairly often. This technique is a split toning. A basic description of this would be a duotone image with 1 colour being used for the darker tones only and another tone for the lighter tones only.

It might be easier to show you some examples:


(Note this image is for sale here: http://www.redbubble.com/works/show/19612)


(Note this image is for sale here: http://www.redbubble.com/works/show/19582)


So how do I get this effect, quite simple really if you have even a rudimentary knowledge of photoshop, and I can assure you a rudimentary knowledge is all I have.

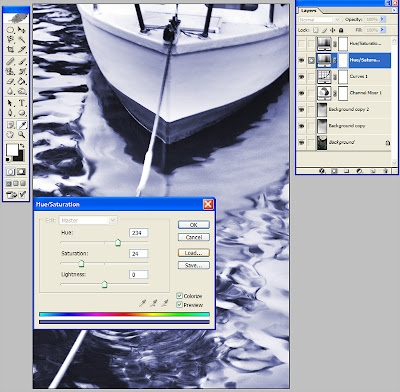
To begin with I transform my image into a black and white image with the tones/contrast that I want. Next I create a hue saturation layer, the 2 colours I believe work best are blue and red as in the mid tones where they blend they form a nice purple colour.


This next image shows the result after the first hue saturation layer has been applied. You have to make sure the colourize box is checked and then just pick a colour and saturation that you think suits, as this is done as an adjustment layer you don't have to worry too much about getting the precise colour yet as you can come back and make adjustments later.


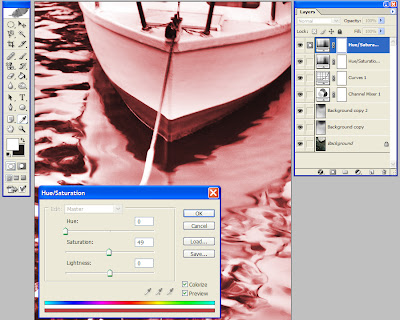
Next you create your second hue/saturation layer above the previous one with the second colour you want.


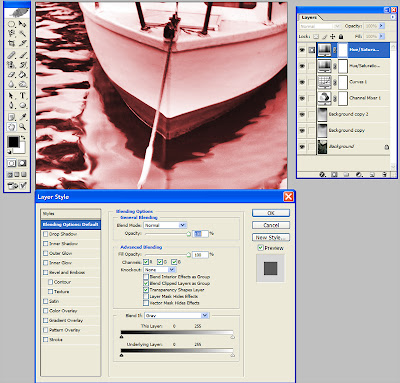
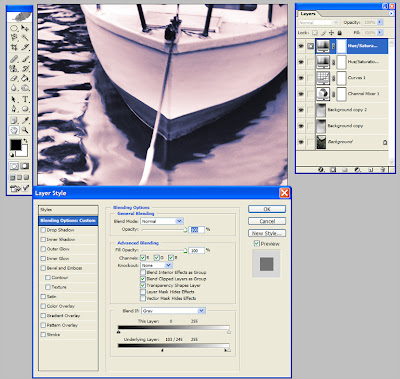
Now this is when the magic happens, by double clicking on the blue section next to the title hue/saturation in the layers palette, you will bring up the layers style box, make sure you do this on the top layer of the two.


Down the bottom of the box you will notice to 2 gradient bars, these bars are used to determine how much of the current layer is blended. The top bar is used for keeping, rejecting tones in the current layer, the bottom layer is used for keeping/rejecting tones based on the tones in the layer below, for this procedure I use the bottom one. You will notice markers at either end, these slide inwards, by sliding the black one to the right you are saying do not show anything on the current layer that is darker then the point it's at. It is hard to see but if you look carefully you will see that there is a line down the middle of the slider, this is because the slider can be split into two. You may be asking why we would want to do that, by splitting the slider in two and moving the right hand side (in the case of the darker slider) towards the right we make the blend between the two tones a lot smoother and gives a blend between the two layers, in the case of red and blue it forms some nice purple shades. Anyway here is a shot showing the adjustment in this image.

Next is just fine tuning until you have the image the way you want. I hope you have found this interesting and informative and if you have any questions about this technique please post them in the comments and I will try and clarify further.


Wednesday, 16 May 2007

Stand Tall

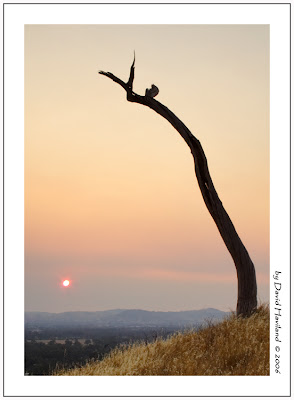
Today's subject is a picture I took last December in Albury during the height of the NE Victorian bush fires. The smoke from these fires had settled over Albury/Wodonga and was producing some quite unusual and at times eerie skies, especially early in the morning and late in the afternoon. It was quite unusual to be outside in summer and not cast a shadow because the light was that diffused because of the smoke.

I had been out a few times trying to find a subject to take full effect of the conditions. these unique conditions afforded me the ability to shoot more directly into the sun without creating silhouettes due to the filtering effect of the smoke. This day I had been going out with a particular imagein mind, there is a dead tree that sits on quite a steep side hill on East Hill in Albury. I have used this tree as foreground interest in images before and I had this in mind for an image this day. Following is the image I had in mind.


However on the way to this location,it is about 5 minute walk along a track, I have to pass a section of tall wild grass that is very dry due to the drought. I had passed this long grass many times, however this day the light shining of the grass seeds and stems caught my attention, well in actual fact it jumped up and screamed shoot me.So I took about a dozen shots, with different variations.

I continued on my way as I still had the image above in my head and had to get it out. I did my thing and then returned home.

When I first got home I still had the above image in mind and processed that image. It was not till the next night that I had a look at the other images I had taken the day before and saw the first image I had taken of the grass, it instantly struck me that this was an image with far more potential then the image that I had gone out to shoot and had already processed.

Following is the image as it came out of the camera with the default settings that the camera sets.
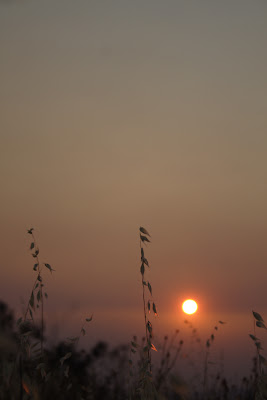

You might think that it is pretty uninteresting, however even at this stage it has enough going for it to get my attention. So what are the things that attracted me to it:


-First thing is the light hitting the tall stalk in the middle.

-The sun adds another interesting dynamic to the image.

-Lastly it was the simplicity of the image.

So as I shot in raw I had a bit of latitude to adjust some of the elements that are currently detracting from the image, such as:

-The colour tones are a bit too dark and a bit too drab. I fixed this by adjusting the exposure up, adjusting the contrast up and changing the colour temperature towards the warmer end.

-The second thing that detracts is that there are too many stalks in the foreground competing for attention. This was fixed by a crop.

So after adjusting these in raw I came up with the following output.

Now this is starting to look more like what I had in mind when I saw the potential out in the field and in the initial raw file.

From here it was a quick clean up in photoshop, via cloning, of distracting elements like the seeds poking into the sky on the left and the light spot in the middle right on the bottom edge. I framed this image in black as I feel it helps draw out the colour more and then you have the final image.
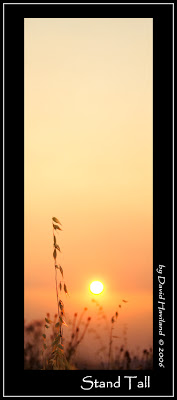
So as you can see even if you go out with an image in mind it is good to keep an open mind and eye and look for the potential that is all around.

I hope you have found this explanation of this image enjoyable and informative. If you would like to buy a print of this image, they are available here: http://www.redbubble.com/works/show/20474


Cheers,
David Haviland

Tuesday, 15 May 2007

One Perfect Day

Firstly a brief history of me, I am an Australian, born in Melbourne, raised in Wollongong and have been living in Albury for the last 10 years. I have an engineering degree and have worked in manufacturing and I am currently working in Technical Sales.

About 2 years ago I got my first digital camera and copy of photoshop and it lit a fire under my creative side. Since then there is barely a week that goes by where I do not go out taking photographs.

What I would like to do with this blog is show you some of my photographic images and describe a bit about how I came to shoot the image and what I have tried to achieve with the processing.


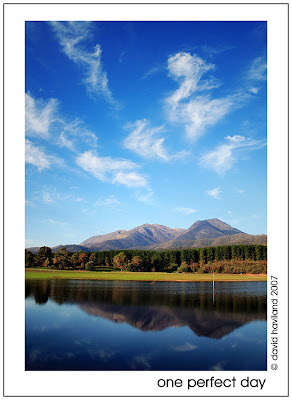
This shot was taken on Saturday 12 May 2007 at Lake Buffalo, Victoria.

My decision to go out shooting this day was a spur of the moment decision, being Autumn and the colour being out around my region I thought I would head towards Bright and Mt Buffalo. While passing through Myrtleford I saw a sign which said Lake Buffalo. After another spur of the moment decision I ended up at Lake Buffalo, hoping to get a nice reflection shot and this day nature did not disappoint. Awesome scenery, great reflection and wonderful clouds. What can I say it was “one perfect day”.

As I said once I had made the decision to head towards the Lake i was already pre-visualising the type of shot I would take. Although I had never been to the spot before ,I could see that there was wonderfully wispy clouds in the sky and hardly a breath of wind, the perfect conditions for a reflection shot. Upon arrival and a quick drive and walk around the area, I picked my spot. The ruggedness of the mountains was a great backdrop to the image and a superb subject for the reflection.

As I mentioned before the clouds were wonderfully wispy this day and just kept rolling through.

In the end I spent nearly 3 hours at this place taking images as the sky and light changed. I ended up with 4 images I was happy with, with many subtle variations of them. Of these 4 this image is my pick because of the following reasons:

- I have images with a mirror finish, however I prefer the subtle ripples in the foreground and the stronger ripples closer to the far shoreline, I feel these add some character and texture to the foreground.
- I also have images with complete symmetry between sky and reflection, however none of these showed off the full majesty of that sky and clouds.
- I like the way that the clouds are forming lines that intersect at the tallest peak, this helps to highlight the light on the mountain and the texture of the creases in this mountain range.

I hope this has given you some insight into the thought process behind the creation of this image.

If you would like to buy a print of this image it is for sale here:
http://www.redbubble.com/works/show/22487

More of my images are for sale here:
http://www.redbubble.com/people/havy2008

And images for viewing here:
http://www.potd.com.au/gallery/hav